Photography Tips for Beginners
There’s an old saying in photography: the best camera is the one you have with you. It means that the key to taking great photos isn’t necessarily owning the fanciest camera with the most expensive lens or lenses. For photographers, it begins with a camera you’re most likely to take with you wherever you go.
The good news is that today’s digital cameras are generally so good you don’t need to invest thousands in the best photography gear, heftiest lens and priciest attachments -- then lug them everywhere -- to learn to take gorgeous photos.
Which means that for beginners, more valuable than splurging on high-end photography equipment with the latest and greatest exposure control gadgetry is to get help honing your creative skills and mastering your camera’s image settings.
Let’s get started with some helpful tips for the beginner photographer.
Understand the 3 Camera Settings That Matter Most in Photography
You probably know that your camera’s Auto mode makes it easy to snap a decent photo just by pressing a button. To take your photography to the next level, however, you’ll need to get acquainted with your camera’s adjustable ISO, aperture and shutter speed settings.
ISO
Your camera’s ISO setting determines its sensitivity to light. Selecting a low ISO number makes the camera less sensitive to light, while selecting a high ISO number makes it more sensitive to light.
Selecting a high ISO number is ideal for shooting photos in low-light situations where you’d prefer not to use a flash. The higher you set your ISO, however, the more likely your photography will be marred by unsightly visual noise that reduces your photos’ effective resolution.
Choosing an ISO of 100 to 200 works well when shooting photos outdoors during daylight hours, while an ISO of 400 to 800 may be needed for shooting photos indoors or at night. (If your camera’s ISO settings can be set above 800, experiment with these higher settings until the visual noise they introduce makes your images unattractive.)
Aperture
You can also adjust how much light reaches your camera’s sensor by changing the aperture.
Using a lower f-number (e.g., f 2.0) enlarges the aperture and lets in more light; a higher f-number (e.g., f 22) shrinks the aperture and lets in less light. Interestingly, by adjusting the aperture you also adjust your camera’s depth of field, which determines the distance in front of your camera that stays in focus. At a low f-number your camera’s depth of field is shallow and your subject -- like this image of a bicycle wheel -- stands out nicely from its surroundings:

Photo by RoonZ on Unsplash
At a high f-number your camera’s depth of field is wider and a longer distance in front of your camera remains in sharp focus -- making it ideal for photographing a large group like this:

Photo by Church of the King on Unsplash
Shutter speed
The more time your camera’s shutter remains open, the more light reaches its internal sensor -- and the blurrier motion becomes. A fast shutter speed (e.g., 1/1000 of a second) freezes equally fast action, such as the spinning rotors of this helicopter:
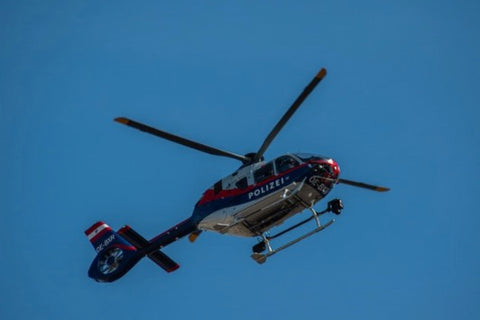
Photo by Michael Constantin P. on Unsplash
A slow shutter speed (e.g., 1/30 of a second) allows motion to blur, such as the cityscape behind this fast-moving scooter:

Photo by Rowan Freeman on Unsplash
Extend Your Creativity with a Tripod
Speaking of shutter speeds, keeping your shutter open for a lengthy period of time typically requires a tripod -- as when you’d like your photography to turn the headlamps of speeding cars into these streaking laser beams of light:

Photo by Frankie Lopez on Unsplash
Indeed, a tripod is vital whenever you’d like to capture a sharp photo in low light without having to push your camera’s ISO so high it may add unwanted visual noise to your image.
Tripods are also essential for learning the otherworldly realms of long exposure photography. For instance, aiming your tripod-mounted camera at the night sky and leaving its shutter open for a really extended period of time -- usually measured in minutes -- can produce a spectacular image of a starscape:

Photo by Patrick Fore on Unsplash
Of course, tripods are useful for conventional photography, too. If you’d like to become a photographer known for eye-catching landscapes or striking architecture or still life scenes you’ll take the best shots with a good tripod to help you control your composition. The only possible exception is travel photography, where, depending on your destination, your tripod may be an encumbrance.
Want Photos That Are Well Done? Shoot them RAW
Even beginner photographers are probably familiar with the popular JPEG image file format. But when you’re ready to get serious about photography you’ll want to start shooting photos in the RAW file format that, unlike JPEG, records all your camera sensor’s image data uncompressed.
The RAW image file format does more than deliver higher quality photos than JPEG: it gives you greater control when you edit your images on a Mac or PC. That means that when an otherwise stunning image suffers from over- or underexposure, poor contrast or improper white balance or color temperature you’ve got the help you need to correct them.
Even better, you needn’t invest hundreds in a program that can open, edit and control RAW files. Inexpensive applications like Photoshop Elements or PaintShop Pro and even free image editors like Photivo or digiKam give you the power to tweak all your RAW photos.
Put a Flash to Work
Using a flash attachment effectively can require some experimentation. So you may have to accept that until you’ve got some flash images under your belt you may have to suffer through some red eyes, blown-out faces and harsh shadows.
On the other hand, aim an external flash at a white ceiling and watch how nicely it complements ordinary indoor light to deliver natural, diffusely lit event photos. (And when a white ceiling isn’t available, limiting your flash’s brightness with a scrap of paper or strip of opaque tape may also do the trick.)
Plus, a flash can be just as useful to augment conventional daylight out of doors. Use it discreetly to erase unseemly shadows -- think of crow’s feet around eyes or the dark folds produced by wrinkles in clothing -- and no one will suspect you used a flash at all.
See the Light at Sunrise and Sunset
What do those 3 most important camera settings -- ISO, aperture and shutter speed -- have in common? They change how much light and dark your camera sees.
And when is the light and dark around us often most striking, no matter where we are? Sunrise and sunset, of course!
When the sun is low in the sky its light casts a warm, soft, engaging glow your camera should find irresistible.
Regardless of what you’re shooting -- from an autumn landscape to an intimate portrait or still life -- early morning or evening light can imbue your photos with an artful serenity and peacefulness.
True, the average sunrise or sunset can be an all-too-common subject for photographers. Still, it’s an ideal time of day to learn more about how you and your camera can see the light.
Master Your Focus Modes
You may know what you’d like to focus on, but does your camera? Mastering focus means practicing with your camera’s autofocus modes and knowing which to turn to for photographing wildlife, sports, street scenes and so on.
As a beginner, you may prefer single autofocus mode. It locks your camera’s focus on the subject you’ve decided to shoot and is satisfactory for photographing stationary or slow-moving subjects.
Continuous autofocus modes are better for shooting faster moving subjects. You may think that having your camera autofocus continuously on a fast-moving subject is superior to using single autofocus mode on a stationary subject, but since continuous autofocus modes don’t always work well -- especially in unpredictable light conditions -- you’ll need to experiment with both to understand which approach suits your situation best.
Lastly, under the most unpredictable light conditions -- as when shooting the night sky -- your camera’s autofocus mode may hunt perpetually for what to focus on. Under such circumstances you’ll be forced to abandon autofocus entirely and set your camera’s focus by hand.
